
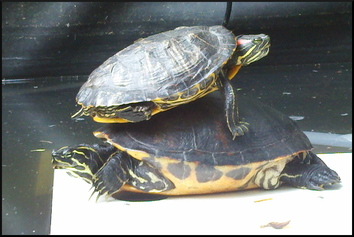
I've taken care of two River Cooters for some sixteen years and a Red-Eared Slider for about four. Over the years they have swam and basked and knocked about in a number of enclosures from glass aquariums to home-built tanks that were typically more functional than they were aesthetic. A year ago we moved to a new home and I built a large outdoor pond so they can soak up real sunshine for most of the year. But we live in Zone 7 which means the winters are cold and ponds freeze over. So to house them in the winter months I built an indoor pond that tucks nicely into the corner of our den.

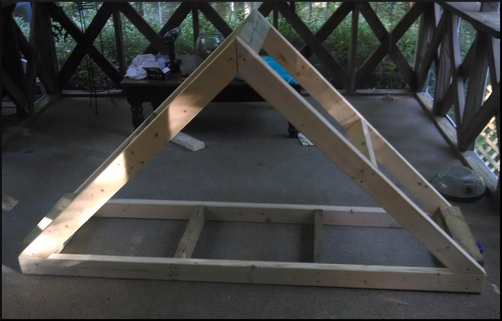
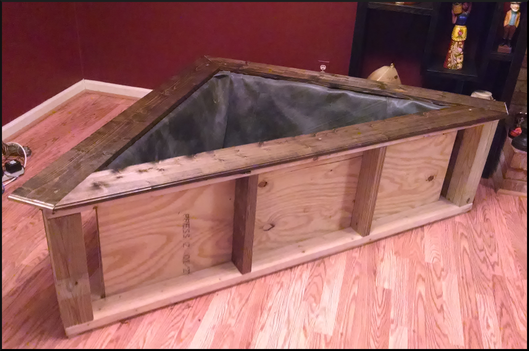
Because the tank is in my den I hoped to marry functionality for the turtles with visual appeal for the humans. I opted for a corner unit which meant I needed to build a triangle. Geometry! I dusted off the Pythagorean Theorem to help determine the measurements for the tank. Then I screwed some 2X4s and 4X4s together into a basic frame.
That electronic stuff in the way is my modem and WiFi router. I guess I'll have to reroute some wires.
Good news! The crawl space was dry and pest free. I moved the cable wire and reinstalled the internet equipment in another part of the room. The internet is back up and reddit.com, various baseball blogs, and that Grateful Dead show I was streaming from archive.org are once again available. Panic subsides.
I screwed a few braces into my frame. Because, you know, support and stuff.
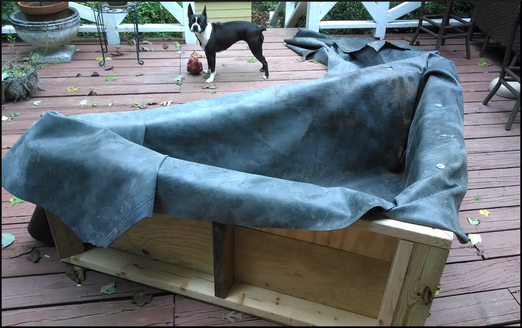
That’s Maggie at the top. She’s usually in the middle of things. Anyway, I failed to take a picture of the tank before I started installing the liner but I used ½” plywood to box the sides and bottom.
The pond liner is 45mil EPDM rubber made by Firestone. I purchased a large piece of it from Drs. Foster and Smith to line my outdoor pond. I was happy to discover that among the remnants weathering next to my workshop was a chunk that met the dimensions of my new tank.
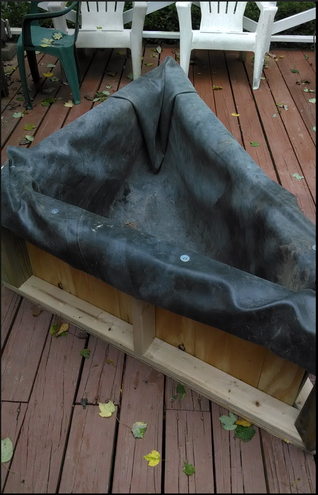
Fitting and securing a large piece of heavy rubber into a box sounds like a straightforward proposition. It's not. It's a tedious and aggravating pain in the ass. You pull here, it tugs there. You fold this, it gapes that. But I fussed with it until it fit. I used stainless steel lag bolts and large washers to secure it to the top of the frame and trimmed off the excess liner with a razor knife.
I gave Home Depot some money and they let me take home a stack of 6” white pine boards and some Minwax stain. I carefully measured and cut three boards for the top. A dry fit was deemed a success so I ran my router around the outside edge to give it a little style and stained the boards Espresso. A few hours later I used screws to secure the boards to the frame.
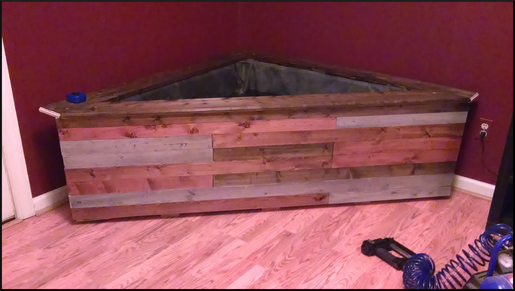
My wife and I spent about ten minutes at the kitchen table agreeing to a pattern for the sideboards. We had four stains: Espresso, Red Chestnut, Gray, and Honey. I took those 6” white pine boards and ripped them in half on my table saw. I cut the boards to three lengths and marked on the back of each one its position and color. The wife sanded and applied one coat of stain to all the pieces.
I used my air compressor and finish nail gun to fasten the sideboards to the frame. I have to admit I really like the result.
I needed a light fixture to hang above the tank to provide fake sun and heat for the turtles as well as a few houseplants. We prowled the internet but nothing really fit our fancy or our budget. So I decided to build one.
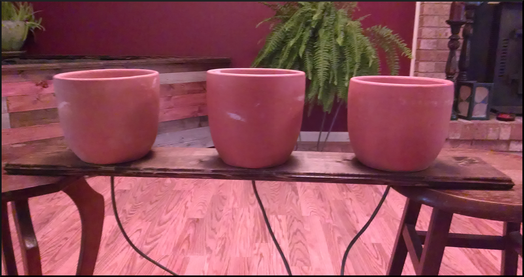
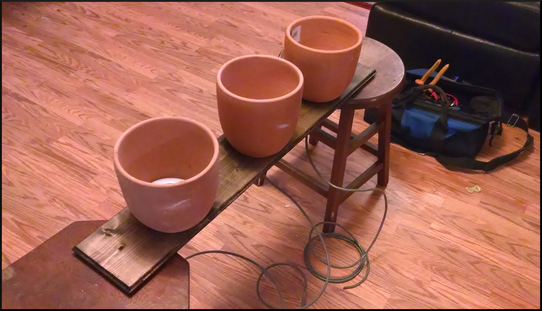
I bought three terra cotta flower pots for $5 each at a local discount store and transformed them into lamp shades. Some of that 6” white pine board was left over so I cut a piece and ran the router around it to give it a little style and stained it Espresso to match the top of the tank.
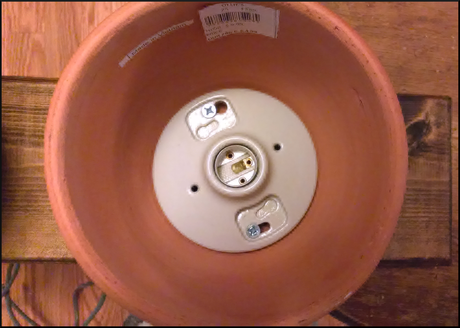
I gave Home Depot some money and they let me have three ceramic light sockets rated at 600 W. I used a socket as a template to mark the screw locations and used a masonry bit to drill two holes in each pot. I drilled a third hole in the center for the electrical wire.
I found some scrap 16 awg stranded wire in my big box of spare parts. I spaced the pots evenly on the board, connected a length of the wire to each socket, and used deck screws to attach the socket and pot to the board.
Here’s another shot of the lamp assembly.
I made a list of all the parts I needed to hang the fixture over the tank: chain, wire, switch, ceiling hooks, electrical plug. So I went to Home Depot to start my scavenger hunt. And then, lo and behold, somewhere between the sconces and ceiling fans I found a narrow peg wall of lighting accessories and on that wall I found a light fixture hanging kit that contained chain, ceiling hooks, and a wire with a plug and switch.
An associate came by and asked if I was finding everything OK. "Yes," I answered, "everything is perfect."
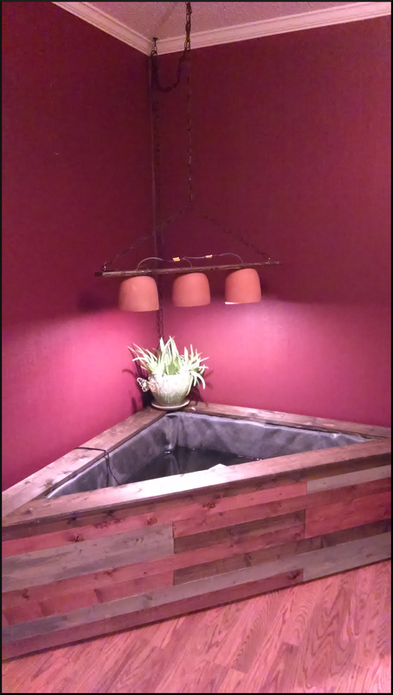
I found two eyelet screws in my big box of spare parts and twisted them into the board of my new light fixture and attached the chain from the kit. I threaded the electrical wire through the chain and tied it in to the wires from the sockets with butt connectors.
I spent a disproportionate amount of time searching for a ceiling joist to screw the hook into but it was necessary to support the weight. Luckily the joist was centered over the tank.
Now I need to something to hide those wires…
I ordered a stainable wire track from Amazon for just a few bucks. I stuffed the wiring inside and rubbed it with Espresso.
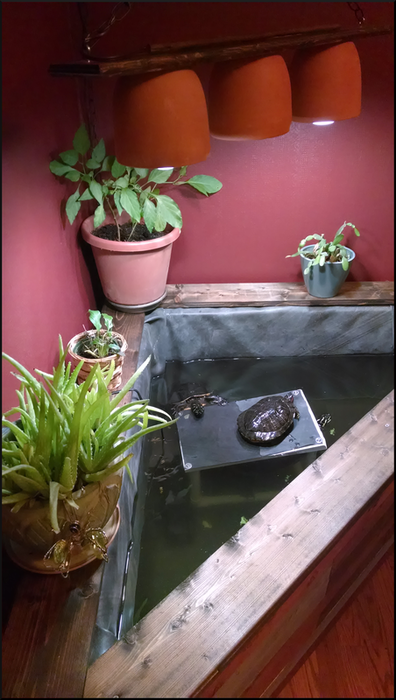
It's necessary for aquatic turtles to climb out of the water to dry their shells and bathe in sunshine. I built a simple ramp from PVC for this purpose. It’s being utilized but it’s proven to not be a perfect solution so I need to make some alterations to it. I assure all my fellow turtle keepers that my crew is getting a regular dose of high and dry.
I love this picture. You can see all three of the turtles. Most people would think I’m nuts if they knew the time and money that have gone into the care of these shelled beasts over the years. It's a challenge to give proper care to exothermic aquatic reptiles that don't have the ability to tell you when there's too much poo in their water, or when they need more iron in their diet, or when their shells aren't absorbing enough sunlight. But it's so fun to watch them feast on kale and greens and strawberries. And it's fun to see them soaking in the summer sun with their back legs stuck out so silly and their necks extended to catch every single ray.
They have been with me a long time. The least I can do is make their lives as comfortable as I can.
Thanks for checking out my build. I'm open to constructive criticism and comments on how to improve things.
Inspiration, move me brightly...

